Source Code:
https://github.com/elang2/spring-boot-sample-appsConcepts Involved
- NoSQL Database
- Spring Data
- Spring boot
- Maven
- REST services based on Jersey
Overview Diagram
 </img>
https://github.com/elang2/spring-boot-sample-apps </img>
#How Docker Works ON OSX
On a Linux installation Docker runs directly on the host but on MAC OSX it runs in a slightly different manner. Instead of running directly on the host, docker runs on a small light weight scaled down Linux virtual machine named ‘default’. The docker daemon is running on the linux VM and you use the docker client to connect to it.
 </img>
If you execute the following command in the shell you will see that the IP address returned is different from the HOST machine.
$docker-machine ip default
190.121.110.2
#Overview of Volumes in OSX
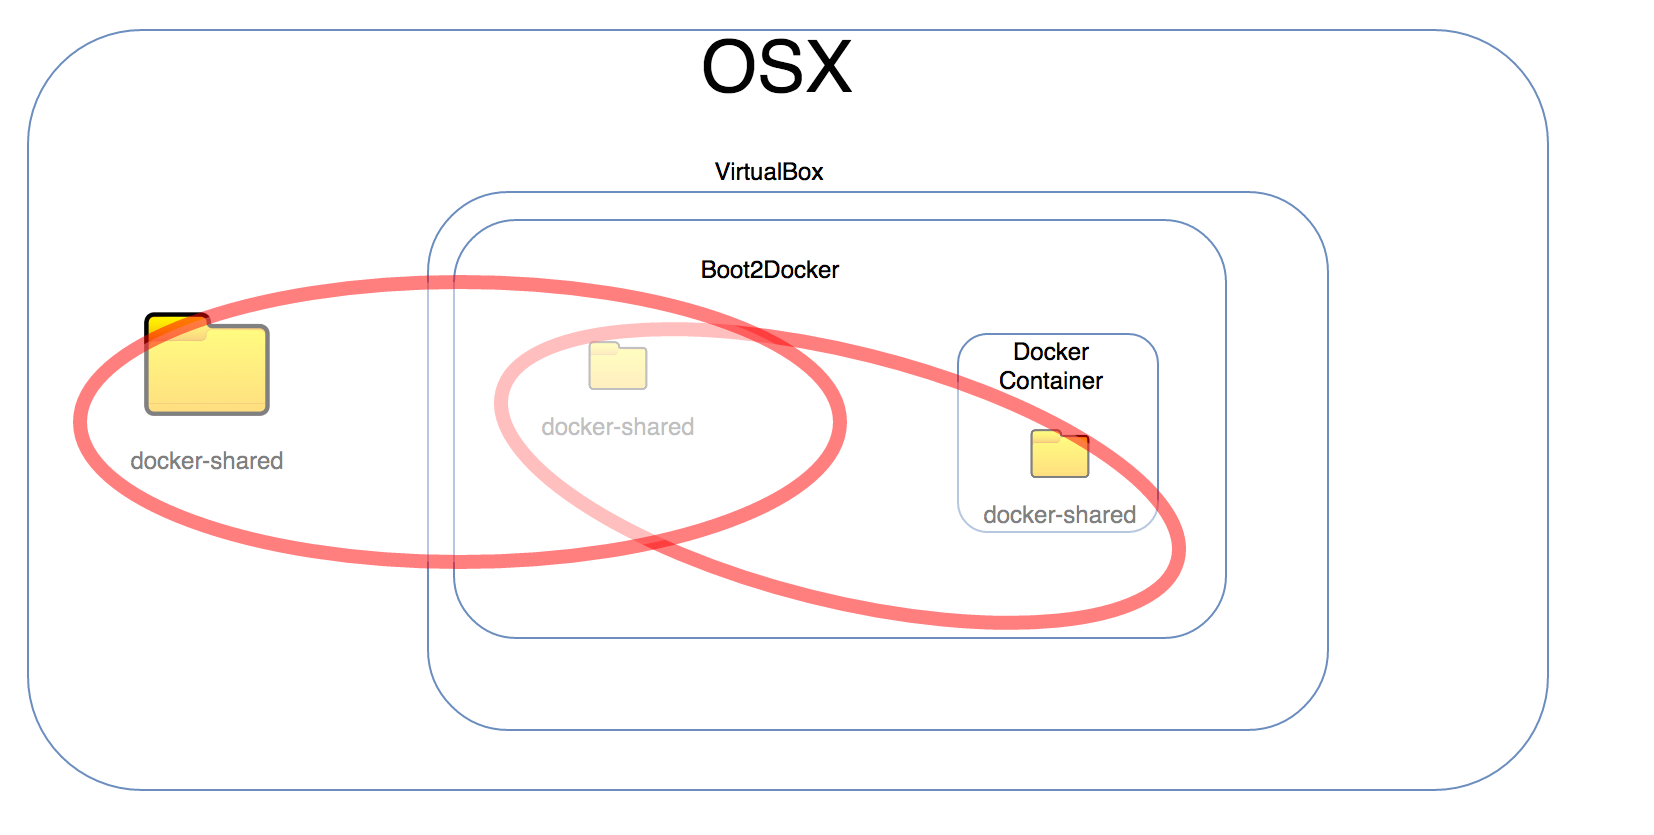
Volume Mounting :
A directory present on the OSX (host machine) is first mounted to a directory of the same name(need not be of the same name) on the VM. This ensures access of the host(OSX) directory contents to the guest OS (boot2docker ‘default’ VM). Now when the “docker run” command is executed with the volume parameters, it is the “directory” on the guest OS (boot2docker ‘default’ VM ) which gets mounted onto the container.
 </img>
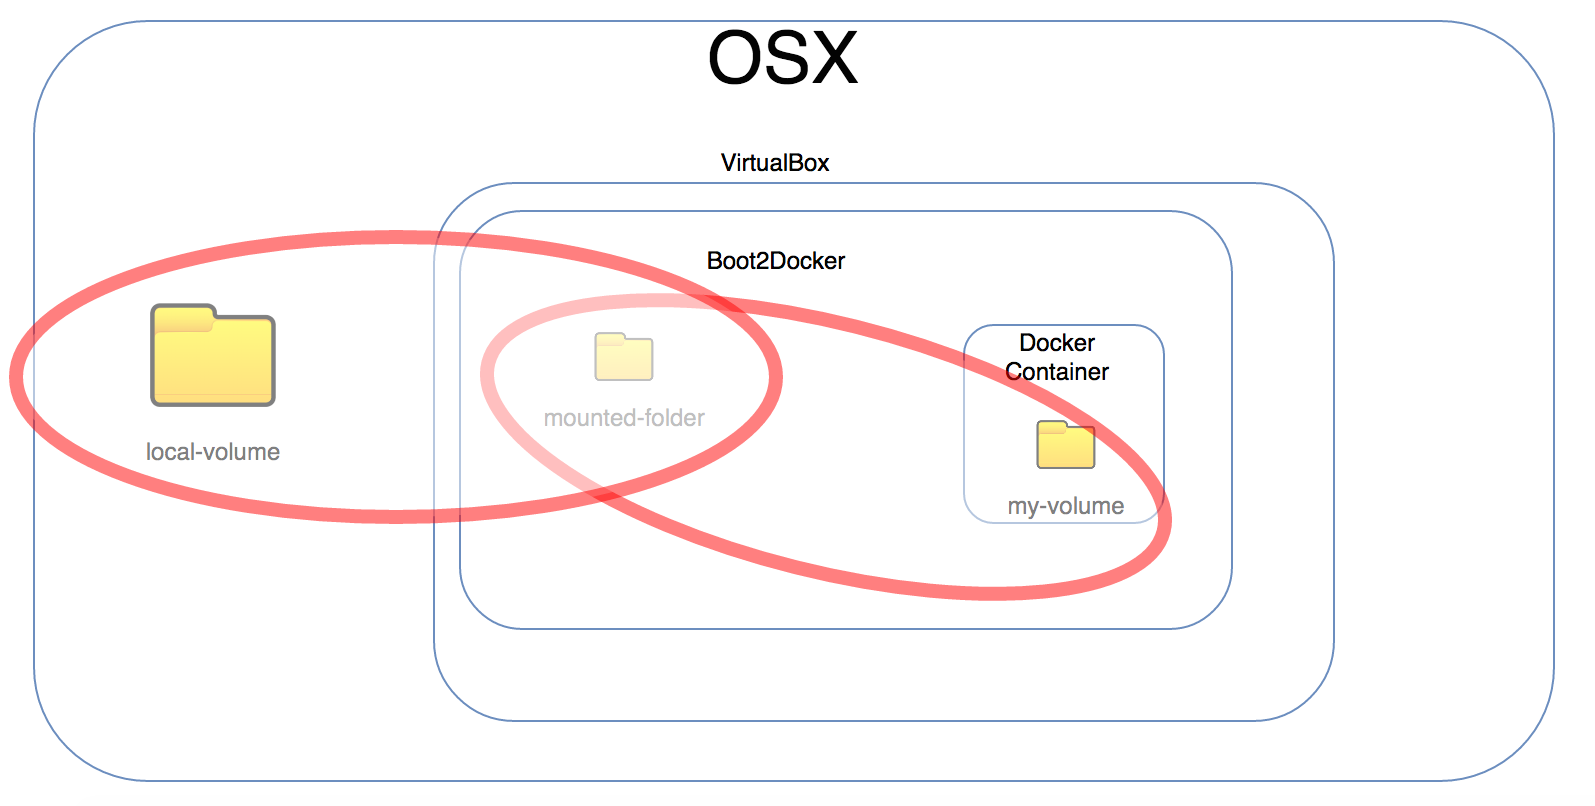
Example with different directory names:
 </img>
#Volumes in OSX
Containers are nothing but images with a read-write layer on top of it. This read-write layer enables the process running in the container to read and write files during its run. Once the container exist, the data written to the file system is removed.
Volumes help bring in data persistence to containers. Data stored in volumes are persisted even after the container has exited. Volumes are nothing but a directory present on the HOST machine which is mounted to the container. Any information that the container writes to this mounted directory or in this case called VOLUME, persists independent of the container lifecycle.
Below is an example of how to mount volume while starting the container.
The -v command param is asking docker to make the ‘docker-shared’ directory present in the current location and expose it as ‘mounted-volume’ at root location of container VM.
docker run -v ./docker-volume:/mounted-volume --name=docker-volume-demo my-imageThis would be a straightforward task in Linux installations but in OSX, since Docker is running on a Linux VM, we would have to create a mount pipe between the HOST and container through the Linux VM.
#Steps(With VitualBox as provider) :
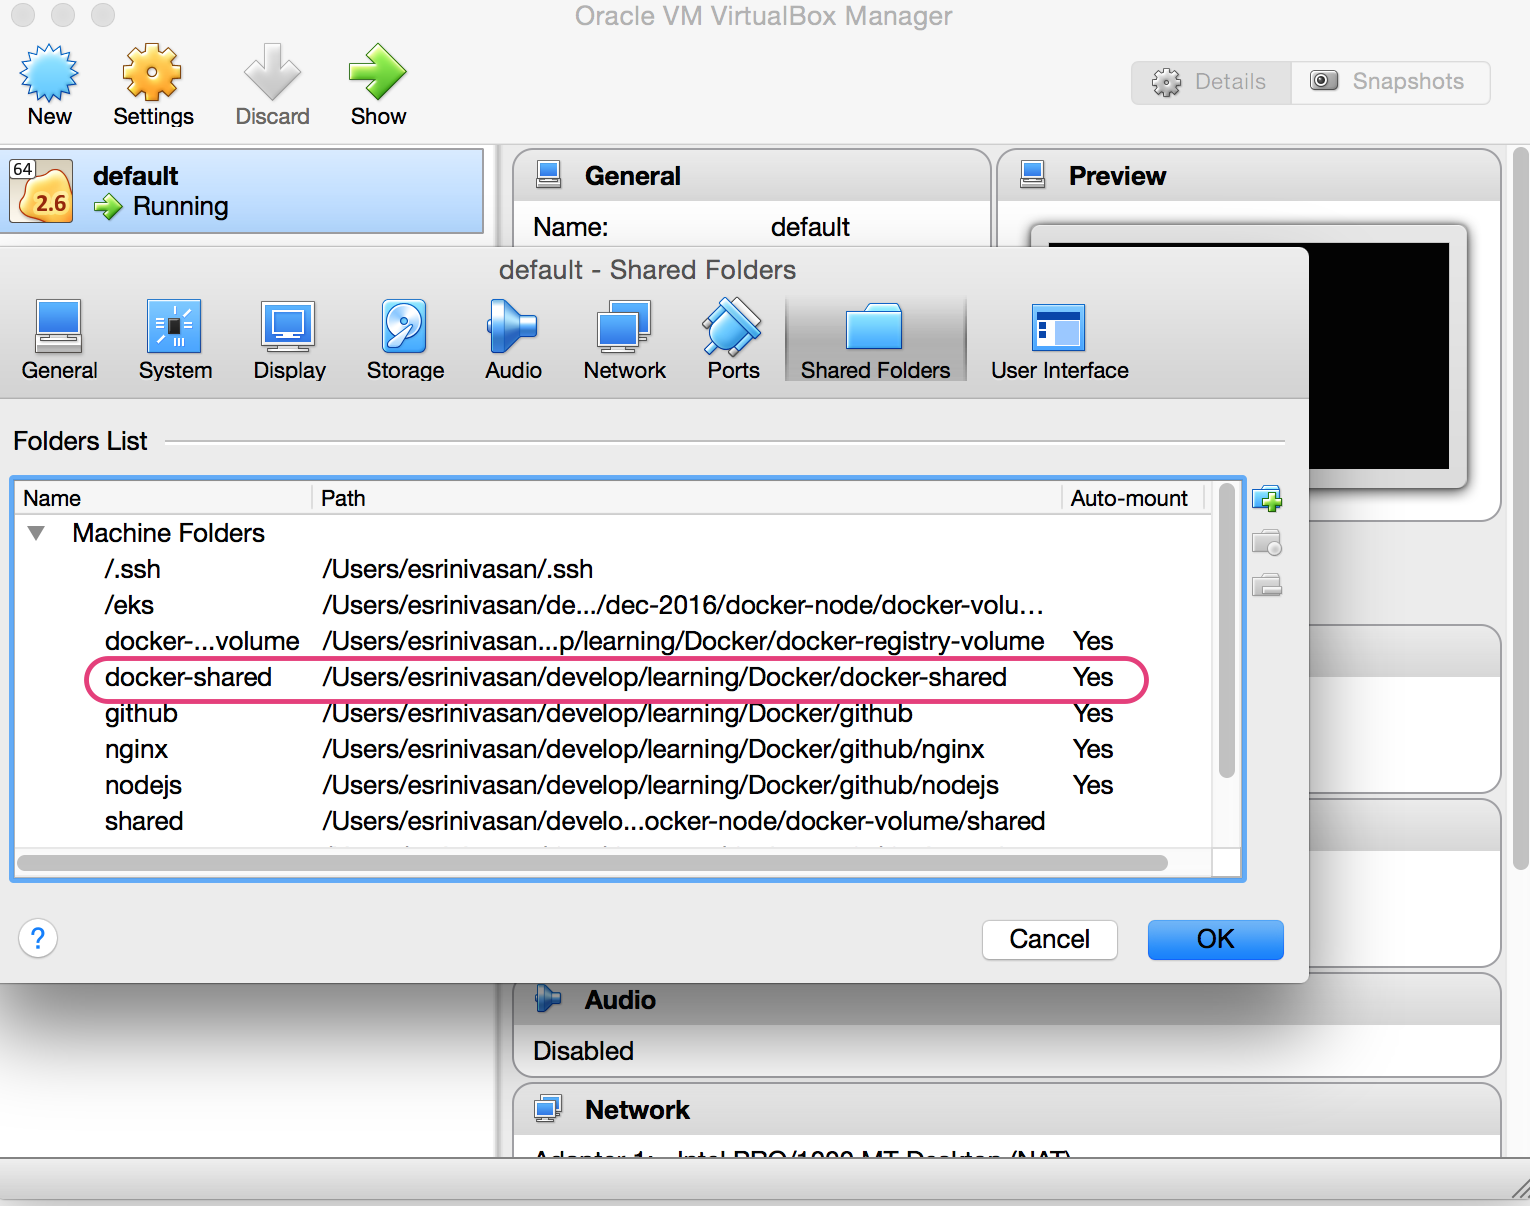
1 . Open up the Virtualbox UI and find the ‘default’ machine.
2 . Click on ‘Shared folders’.
3 . Add a new shared folder. Set “Folder Path” to a directory on OSX that you would like to use as Volume. Provide a name for the folder. In this example, I have provided “docker-shared” as the name for the folder.
4 . Enable ‘Auto Mount’ and ‘Make Permanent’.
 </img>
5 . Log into the running ‘default’ machine using the following command. This should log you into the ‘default’ Linux VM’s shell.
$docker-machine ssh default

Note: Make sure that the boot2docker[default virtual machine (vm)] is already running.

Use the following command or start the "default" VM via the VirtualBox application.

$ VBoxManage start default

Ensure the terminal connects to the docker boot2dock virtual machine

$ eval "$(docker-machine env default)"
6 . Execute the following command and note down the GID and UID values.
docker@default:~$ id
uid=1000(docker) gid=50(staff) groups=50(staff),100(docker)
7 . Create a directory named ‘docker-shared’ on the Linux VM
docker@default:~$ mkdir docker-shared8 . Execute the following command to mount the host directory previously shared to the VM
Syntax : sudo mount -t vboxsf -o defaults,uid=
docker@default:~$ sudo mount -t vboxsf -o defaults,uid=1000,gid=50 docker-shared docker-shareddocker@default:~$ exit$docker run -v ./docker-shared:/docker-shared --name=docker-volume-demo my-imageroot@3af1249144e1:/# ls
bin boot dev etc home lib lib64 media mnt mounted-volume opt proc root run sbin srv sys tmp usr var
root@3af1249144e1:/# cd docke-shared
root@3af1249144e1:/docker-shared# ls
root@3af1249144e1:/docker-shared# mkdir testdir
root@3af1249144e1:/docker-shared# ls
testdir </img>
Enforces a contract between sender and receiver services by using its own schema specification language. The PROTOC (Proto compiler) can translate the schema into language specific objects for use in your application.
The size of the payload resulting from Protobuff encoding is smaller in comparison to how it would have been if the data were transmitted as JSON or XML.
The Protobuff schema is backward compatible. This means that two services using objects generated from different versions of ProtoBuff schema can still send and receive information between them without resulting in any runtime exceptions. The Protobuff framework takes care of serializing fields which match the ones defined in its schema version and ignore any that don’t match.
Field level validation and extensibility. Validation for field types, values using Enum and ordinality can be easily defined in the schema. Also one can easily import the schema into other schemas to create new structures.
Language interoperability. Since the payload is bytes, the sender and receiver sharing the schema can be implemented in any language. You can have a Java Webservice talk to a different server written in C++.
Protos makes sense for back-end system to system services where there is no need to have visibility of the payload being transmitted.
Ideal for microservices architecture where each service is deployed independent of each other. The backward compatability of the schemas ensures that different service can work well while still using different versions of the library.
Front end to backend communication. The payload in case of protos is byte data. It’s easier for the front-end to receive a JSON or XML directly than encoded bytes.
When large HTML or XML data needs to be transmitted.
Want responses in human understandable format.
When you don’t want to have a contract for communication.
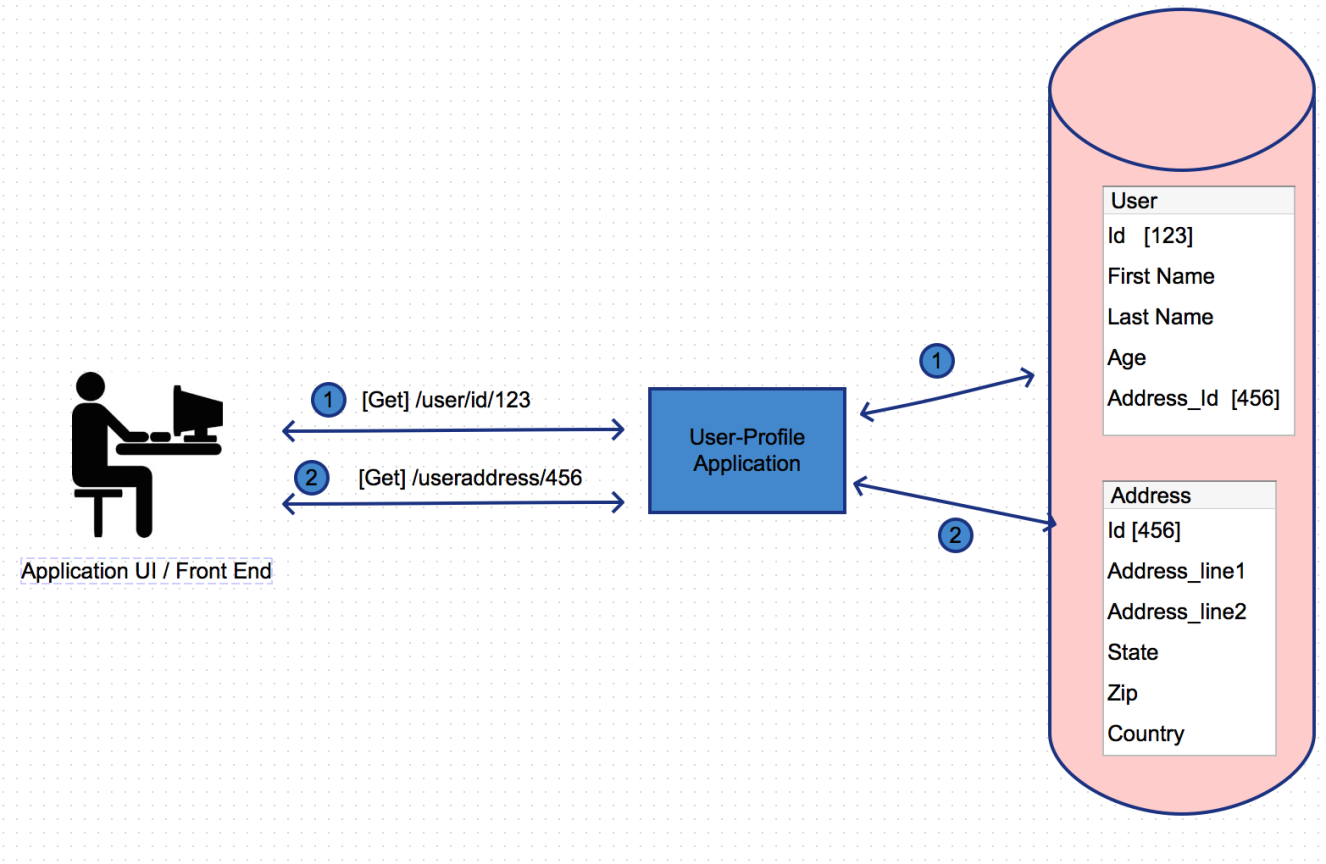
These are objects which are used to hold and transmit information between different processes. The processes could be different services within the same application or could be spread across multiple application in a distributed system. The application may be communicating with each other using Remote calls like RMI or web services (SOAP or REST).
Since communication between different applications/modules involves steps like opening connection, transmitting data over the network and closing it, which makes it an expensive operation.
Data transfer objects are meant as a way of aggregating all the information that needs to be transferred into a simple coherent entity and get it across to the other side without making too much of expensive operations.
Below diagram describes a scenario without the user of data transfer objects. In this case multiple calls are being made to the application service to retrieve the required information.
 </img>
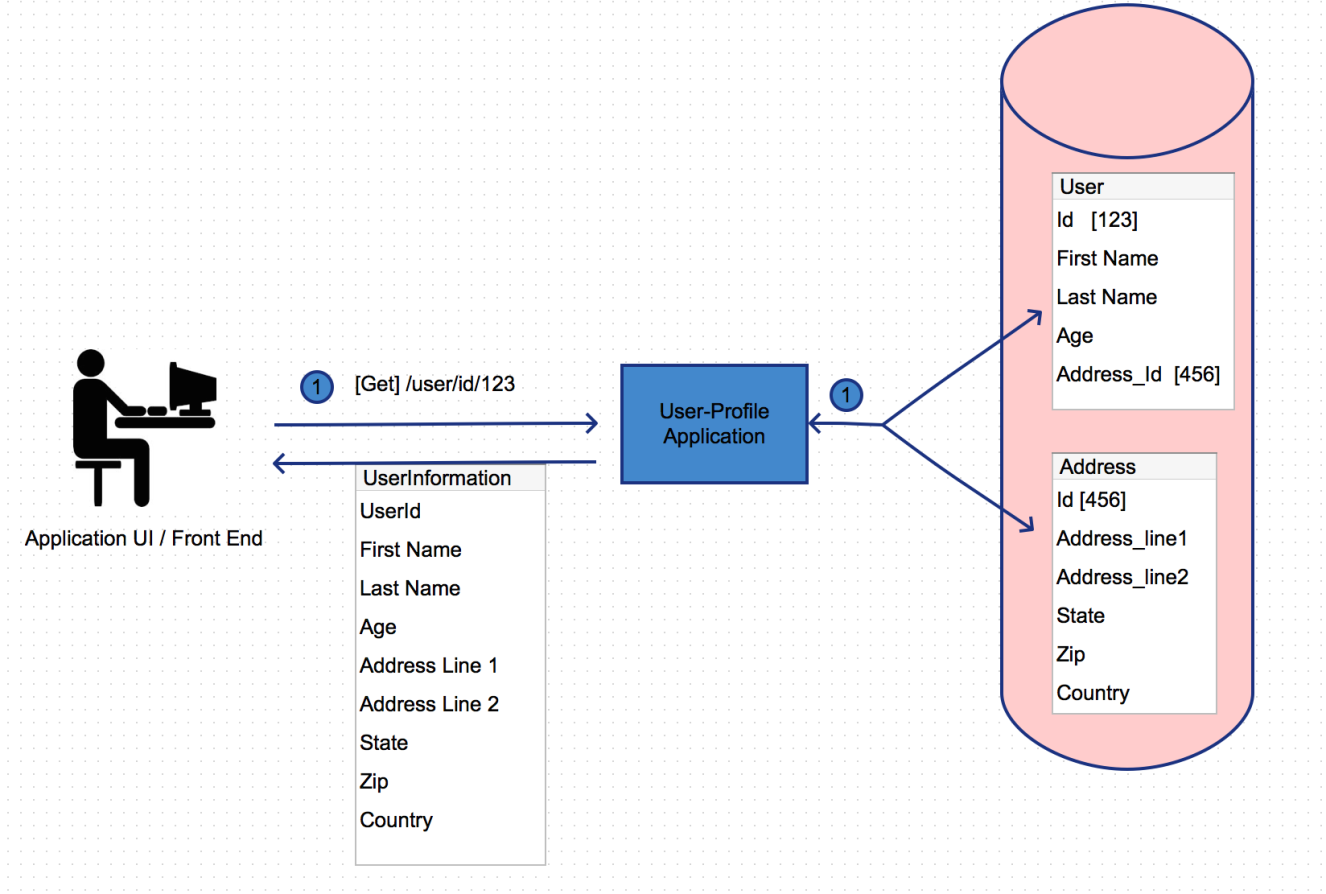
With DTO ( data transfer objects) , the server will assemble all the required information into a single entity and send it back to the client. The client can use what ever fields it needs and simply ignore the other fields or store them for use at another time. Even though the payload returned back is larger, it does definitely reduce the amount of request the server needs to handle for an operation and also reduces any latency associated with data transmission over the internet.
 </img>
 </img>
Hello Everyone. This will be the first part of my multi-part series which will explain the concept of microservices and how to orchestrate calls between them keeping in mind things like performance, latency and scalability.
At the end of this series I intend to have a fully functional multi-tiered application which follows best practices for design and implementation.
I will concentrate on one component per post and also share the source code on Git for your learning purpose and reference.
The traditional way of building web applications was to build one single artifact (say WAR file) which will have all your functionality wrapped inside of it. This single application will do everything from serving user requests, running reports, CRON job, interfacing with databases and other external third part services.
This kind of application is said to be Monolithic in nature.
Microservice based architecture emphasizes on not having a single deployable artifact but to have multiple smaller independently deployable artifacts. Each smaller artifact deals with only part of the applications functionality. All modules work together to provide the functionality required of the application. Advantages of Microservices over Monolitic
1
Faster releases and changes out the door !!!
Microservices consists of smaller independently deployable modules in comparison to a single deployable artifact in Monolithic architecture. This means that each application has its own code based. So, you can easily split your team into smaller functional teams and have them work independently on different modules without having each other step over one another or be blocked on some dependencies.
If at all there are any dependencies, those can be easily mocked and the work can be carried out without any interruption.
1
More confidence with well tested code !!!!
Since each module is just dealing with a subset of functionality provided by the application as a whole, it much easier to test manually or using automated tool. Its also easy for developers to write unit tests
1
Keep your tech stack up to date !!!
The main goal is for all modules to work well together. It is not necessary for all of the modules to leverage the same technology or frameworks/libraries. Each team can choose to implement the module they own in whatever technology they have expertise in. This also means that its easier to keep the applications tech stack up to date with contemporary library versions and dependencies while giving each team the independence to do what they want.
1
Scale independently, when and how you want !!!!
Each module can be independently scaled up (vertical) or sideways (horizontal) to handle any spike in incoming requests. Modules performing any heavy lifting can scale vertically while those handing light weight stateless requests can scale horizontally.
Microservices help you scale out and back again once the traffic spike is gone.
1
Save $$$ with infrastructure !!!
With microservices you no longer need to have all your VM’s or nodes have the same amount of resource.You are free to allocate more resource to more demanding modules and keep light weight modules on lean hardwares. This will eventually help bring down the computing/infrastructure cost.
1
Less downtime impact !!!!
Each module can be deployed independently without affecting the others. Also, if system is architectured well, the application can still be functional when one or more less important modules are brought down for maintenance or due to some issue.
1
More granular monitoring
More precise monitoring of the applications. Depending on what tools you are using one can easily find out how each module is performing and how its contributing towards any request latency.
1
Save time !!!
Its much easier to isolate a problem to a particular module. This saves time and energy and avoids you having to debug the entire application as a whole.
Since now you are dealing with a distributed system, it becomes difficult to isolate where something is breaking.It is easier to isolate the module but sometimes or most of the times the breaking module might have dependency on other modules for data. The incoming data might be the problem which could be due to an issue in the other module.
Each developer would have a higher responsibility to under the over all system and how different modules interact with each other.
Many moudles and different teams means that there is always some deployment happening somewhere. There is an operational overhead to take care of the deployments and ensuring that the updated components play well with the other existing components.
If the application is large there is a very possibility of having duplication of code/functionality in different modules. But this is a compromise that one has to make when demanding faster development and shorter release cycles for an application.