</img>

With over 11 million users and 30+ million projects, GITHUB is the most popular code versioning tool now. It’s not only used in the public domain to share code with the world but it also used at enterprise level to share code and collaborate with different teams in the organization.

In this blog, I will try to explain how to use GIT ( command line utility) to perform the common operations that a developer might do on a daily basis. All the instructions are for a MAC but should work for other platforms too.

Install Instructions.

  1. Download Git from here.Git

  2. Installation instructions HERE

  3. Once installed, open up a terminal window (MAC/UNIX) or command prompt in Windows and enter the command ‘git’ in window to verify if GIT is installed fine.

Configuration

Git config files are stored in one of the following locations.

.git/config  - The .git folder of the a specific repository.

~/.gitconfig  - Machine user specific configuration.

/etc/gitconfig - Common configuration for all users.
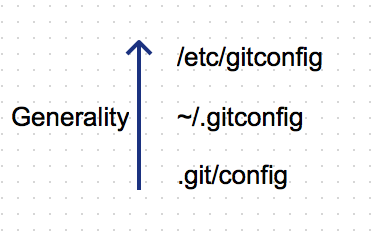
</img>
Configuration in more specific location override those in more general location.

Using Git

In the upcoming section I will explain how to use the GIT commands to achieve the following not necessarily in the same order indicated below.

  1. Creating a new code repository.
  2. Adding files to the repository.
  3. Pushing files.
  4. Making changes to a file and updating the code repository.
  5. Taking the latest code.
  6. Cloning a repository.
  7. Removing files.
  8. Ignore certain files.
  9. Resolving code conficts. [ Pending]
  10. Creating branches. [ Pending]
  11. Merging branches. [ Pending]

Git In Action

  • First register for a github account here.

  • For the purpose of this tutorial, I will keep the username/password as

    1
    (gittutorial@gmail.com/gittest)
    
    .

  • Configure GIT on the machine so that it can talk to the GITHUB code repository.Start a terminal and enter the following commands.

root@machmachine:/# git config --global user.name GitTutorial
root@machmachine:/# git config --global user.email gittutorial@gmail.com
  • Now create a folder
    1
    mycoderepo
    
    and add a file to it.
root@machmachine:/# mkdir mycoderepo

root@machmachine:/# cd mycoderepo

root@machmachine:/# echo 'my first file' > myfirstfile.txt
  • Initialize the current folder as a repository and add the newly created file to be part of the repo.
root@70bb83c437ca:/mycoderepo# git init
Initialized empty Git repository in /mycoderepo/.git/

root@70bb83c437ca:/mycoderepo# git add myfirstfile.txt 

root@70bb83c437ca:/mycoderepo# git commit -m 'My first commit' 
[master (root-commit) 8333c6b] My first commit
 1 file changed, 1 insertion(+)
 create mode 100644 myfirstfile.txt
 
root@70bb83c437ca:/mycoderepo# git status
On branch master
nothing to commit, working directory clean
  • Create repository. Verfiy email if needed.
root@70bb83c437ca:/mycoderepo# curl -u 'GitTutorial' https://api.github.com/user/repos -d '{"name":"git-tutorial","description":"Repo for git tutorial"}'
Enter host password for user 'GitTutorial':
{
  "message": "At least one email address must be verified to do that.",
  "documentation_url": "https://help.github.com/articles/adding-an-email-address-to-your-github-account"
}
root@70bb83c437ca:/mycoderepo# curl -u 'GitTutorial' https://api.github.com/user/repos -d '{"name":"git-tutorial","description":"Repo for git tutorial"}'
...
... // Repo will be created and a long list of parameters returned. We are concerned only about the ssh_url param.
...
..
  "ssh_url": "git://github.com/GitTutorial/git-tutorial.git",
  • Defining the remote location where to push the local repository.
root@70bb83c437ca:/mycoderepo# git remote add origin git@github.com:GitTutorial/git-tutorial.git

root@70bb83c437ca:/mycoderepo# git push origin master
The authenticity of host 'github.com (192.30.252.130)' can't be established.
RSA key fingerprint is 16:27:ac:a5:76:28:2d:36:63:1b:56:4d:eb:df:a6:48.
Are you sure you want to continue connecting (yes/no)? yes
Warning: Permanently added 'github.com,192.30.252.130' (RSA) to the list of known hosts.
Permission denied (publickey).
fatal: Could not read from remote repository.

Please make sure you have the correct access rights
and the repository exists.
  • Pushing files. You will encounter the permission denied error first time. Create a new SSH key as described here to resolve it.
root@70bb83c437ca:/mycoderepo# git remote add origin git@github.com:GitTutorial/git-tutorial.git

root@70bb83c437ca:/mycoderepo# git push origin master
The authenticity of host 'github.com (192.30.252.130)' can't be established.
RSA key fingerprint is 16:27:ac:a5:76:28:2d:36:63:1b:56:4d:eb:df:a6:48.
Are you sure you want to continue connecting (yes/no)? yes
Warning: Permanently added 'github.com,192.30.252.130' (RSA) to the list of known hosts.
Permission denied (publickey).
fatal: Could not read from remote repository.

Please make sure you have the correct access rights
and the repository exists.
  • Once the SSH issue is resolved we can re-try the command to push the code to the ‘master’ branch of the repo.
root@70bb83c437ca:/mycoderepo# git push origin master
Counting objects: 3, done.
Writing objects: 100% (3/3), 232 bytes | 0 bytes/s, done.
Total 3 (delta 0), reused 0 (delta 0)
To git@github.com:GitTutorial/git-tutorial.git
 * [new branch]      master -> master
root@70bb83c437ca:/mycoderepo# 
  • Lets add another file and check the status of the repository.
root@70bb83c437ca:/mycoderepo# echo 'my second file' > mysecondfile.txt

root@70bb83c437ca:/mycoderepo# git status
On branch master
Untracked files:
  (use "git add <file>..." to include in what will be committed)

	mysecondfile.txt

nothing added to commit but untracked files present (use "git add" to track)

root@70bb83c437ca:/mycoderepo# git add mysecondfile.txt 

root@70bb83c437ca:/mycoderepo# git status
On branch master
Changes to be committed:
  (use "git reset HEAD <file>..." to unstage)

	new file:   mysecondfile.txt
  • Lets add few more files. Note that we can user wild cards to refer to files.
root@70bb83c437ca:/mycoderepo# echo 'alert("hi")' > alert.js   

root@70bb83c437ca:/mycoderepo# echo 'timer()' > timer.js

root@70bb83c437ca:/mycoderepo# git add *.js

root@70bb83c437ca:/mycoderepo# git status
On branch master
Changes to be committed:
  (use "git reset HEAD <file>..." to unstage)

	new file:   alert.js
	new file:   mysecondfile.txt
	new file:   timer.js
  • Let’s say that we accidentally added ‘timer.js’ to be pushed. If we want to revert this back.
root@70bb83c437ca:/mycoderepo# git rm -f timer.js 
rm 'timer.js'

root@70bb83c437ca:/mycoderepo# git status
On branch master
Changes to be committed:
  (use "git reset HEAD <file>..." to unstage)

	new file:   alert.js
	new file:   mysecondfile.txt

root@70bb83c437ca:/mycoderepo# 
  • Lets commit and push this to Master branch.
root@70bb83c437ca:/mycoderepo# git commit -m 'adding two files'  
[master 03cfada] adding two files
 2 files changed, 2 insertions(+)
 create mode 100644 alert.js
 create mode 100644 mysecondfile.txt
 
root@70bb83c437ca:/mycoderepo# git push origin master
Counting objects: 5, done.
Compressing objects: 100% (2/2), done.
Writing objects: 100% (4/4), 352 bytes | 0 bytes/s, done.
Total 4 (delta 0), reused 0 (delta 0)
To git@github.com:GitTutorial/git-tutorial.git
   8333c6b..03cfada  master -> master
  • Let’s modify the first file and delete the second file from local repo and push the changes out to remote.
root@70bb83c437ca:/ echo 'adding new line to first file' >> myfirstfile.txt 

root@70bb83c437ca:/mycoderepo# rm -f alert.js         

root@70bb83c437ca:/mycoderepo# git status
On branch master
Changes not staged for commit:
  (use "git add/rm <file>..." to update what will be committed)
  (use "git checkout -- <file>..." to discard changes in working directory)

	deleted:    alert.js
	modified:   myfirstfile.txt

no changes added to commit (use "git add" and/or "git commit -a")

root@70bb83c437ca:/mycoderepo# git add myfirstfile.txt 

root@70bb83c437ca:/mycoderepo# git status  
On branch master
Changes to be committed:
  (use "git reset HEAD <file>..." to unstage)

	modified:   myfirstfile.txt

Changes not staged for commit:
  (use "git add/rm <file>..." to update what will be committed)
  (use "git checkout -- <file>..." to discard changes in working directory)

	deleted:    alert.js

root@70bb83c437ca:/mycoderepo# git rm alert.js
rm 'alert.js'

root@70bb83c437ca:/mycoderepo# git status
On branch master
Changes to be committed:
  (use "git reset HEAD <file>..." to unstage)

	deleted:    alert.js
	modified:   myfirstfile.txt
	
root@70bb83c437ca:/mycoderepo# git commit -m 'updating and removing files'
[master ec42984] updating and removing files
 2 files changed, 1 insertion(+), 2 deletions(-)
 delete mode 100644 alert.js
 
root@70bb83c437ca:/mycoderepo# git push origin master
Counting objects: 5, done.
Compressing objects: 100% (2/2), done.
Writing objects: 100% (3/3), 318 bytes | 0 bytes/s, done.
Total 3 (delta 0), reused 0 (delta 0)
To git@github.com:GitTutorial/git-tutorial.git
   03cfada..ec42984  master -> master
  • If you don’t want some files to be reported as part of ‘git status’ command and never want to push it to remote repository then create a `.gitingore’ file with the file patterns that need to be ignored.
root@70bb83c437ca:/mycoderepo# cat .gitignore 
*.class
**/target/*.war
/*.jar
  • If you want to clone the remote repository on a different machine or at a different location.
root@70bb83c437ca:/mycoderepo# git remote show origin
* remote origin
  Fetch URL: git@github.com:GitTutorial/git-tutorial.git
  Push  URL: git@github.com:GitTutorial/git-tutorial.git
  HEAD branch: master
  Remote branch:
    master tracked
  Local ref configured for 'git push':
    master pushes to master (up to date)

root@70bb83c437ca:/mycoderepo# cd ../mycoderepo-cloned/
root@70bb83c437ca:/mycoderepo-cloned# git clone git@github.com:GitTutorial/git-tutorial.git
Cloning into 'git-tutorial'...
remote: Counting objects: 10, done.
remote: Compressing objects: 100% (5/5), done.
remote: Total 10 (delta 0), reused 10 (delta 0), pack-reused 0
Receiving objects: 100% (10/10), done.
Checking connectivity... done.

</img>

When it comes to application development, its always better to be a pessimist rather than an optimist. Irrespective of how good a developer you are are, the application will surely run into some unforeseen issues once its running in production environment.

Out of memory exceptions every now and then which requires Tomcat to be restarted or a case of degrading application performance which disappears after server restart but reappears after the application has been running for some time.

Such kind of unpredictable behavior of the application is sure to leave every developer flabbergasted. One standard reply most of them will come back with is that “I am not able to reproduce this on my machine !!! Don’t understand what’s going on in PROD”. :-)

Such problems are not difficult to isolate but would require the use of the right tools, perseverance and lots of patience.

In this post, I will explain how to use VisualVm to troubleshoot issues with you application deployed or running or Tomcat.

##Configuration

Visual VM is a JVM profiling tool built on top of JDK tools (jstat,JConsole,jStack,jmap,jinfo).

It does a nice job of representing the data retrieved using the JDK tools in a nice graphical manner.

Visual VM allows you to generate and analyze heap dumps for memory leaks, monitor application heap space , garbage collection activity, CPU usage, threads and many more.

The best part is that Visual VM is open source. Its licensed counter part is YourKit. Setting up Visual VM with Apache Tomcat

  • Download and install Visual VM from here
  • Enable JMX remote on Tomcat so that VisualVm can connect to it.
    1
    To do this, edit catalina.bat(Windows)  or catalina.sh(unix)  and add the following line
    
set "JAVA_OPTS=%JAVA_OPTS% -Dcom.sun.management.jmxremote.ssl=false -Dcom.sun.management.jmxremote.port=9090 -Dcom.sun.management.jmxremote=true -Dcom.sun.management.jmxremote.authenticate=false -Djava.rmi.server.hostname=<IP-Address-Of-Tomcat-Host>"
Explanation: 

com.sun.management.jmxremote.ssl=false
#This will disable SSL while monitoring remote machines`

com.sun.management.jmxremote.port
#Specified the port where RMI registry can reach out to.

com.sun.management.jmxremote
#Allow JMX client to connect to local JVM. This was required in older JDK version(< 6.0).

com.sun.management.jmxremote.authenticate
#Password authentication for remote machine is enabled by default. This needs to be set to false.

java.rmi.server.hostname
#Set the IP address of the host whose JVM needs to be profiled.
  • Start Visual VM and add the ip address of the host running the tomcat to Visual VM.
</img>
Fig 1: Add a remote client
</img>
Fig 2: Remote client details
  • Once you add the host, a tab should appear on the screen. Information about the Threads and Monitors can be found in the sub tabs.

##Making Sense Of the Data

Below is a screenshot of an application which seems to be taking up close to 100% of the CPU and also peaking up the heap space usage.

This is one of the common scenarios that one might encounter in real world. The below graph was collected during a medium load level testing operation that spanned over a period of 20+ minutes.

If you look at the heap graph(right side) you can see that the heap space kept gradually increasing and also there are some lows now and then. If you compare the low’s in the heap graph against the GC activity and CPU usage on the CPU graph(left side), you can see a clear relationship between them.

The lows in the heap graph corresponds to Garbage Collection activity performed by the JVM. Heap goes down when the GC activity increased and at the same time the CPU activity also goes down. This because GC’s are stop the world process. When the JVM is performing a major GC it might cause Tomcat to stall and stop handing requests, which in turn will lead to the front-end client seeing additional latencies or errors.

If the heap continues to increase then it will eventually lead of PremGen or OutOfMemory Exception.

</img>
Fig 3: Garbage collection

To troubleshoot the memory issue you can take a heap dump of the JVM using the ‘Heap Dump’ button present on the VisualVM tool. The heap dump is like a snapshot of object in the memory.

The heap dump is usually stored on the machine running the JVM.

</img>
Fig 3: Garbage collection

You can use eclipse plugins like ‘Eclipse Memory Analyzer’ to open the dump and look at what objects are the reason for the memory leak.

Once you have installed the plugin, in eclipse you can go to File-> Open file -> (Select the heap dump .hprof file). The plugin will automatically start analyzing it and render graphs and histograms for you.

Below is a sample graph. It tells you how the heap space is divided between different objects and also lists what objects and corresponding classes are causing this issue. With this information you can go back to your code and investigate the reason for the objects not being eligible for garbage collection.

</img>
Fig 4: Memory usage pie chart
</img>
Fig 5: Objects histogram

</img>

Cassandra Unit is a library which can intergrate with your Java code and help dynamically spin up an embedded Cassandra instances when needed. Once you are done using this instance, you can just termiated it and the library will take care of cleaning up after it.

What purpose does this library serve ?

  1. Biggest advantage is in
    1
    Unit
    
    and
    1
    Integration
    
    testing. Developers or CI/CD tools no longer need to depend on a centralized database.
  2. Developers can run all kinds of test scenarios on their code and also test you their DML/DDL queryies before executing them on main Cassandra Cluster. Which means faster development, reduced latency and dependency.

##Steps for Spring JUnit :

1. Include the following dependencies in pom.xml

<!--Cassandra Unit Integration With Spring -->
<dependency>
     <groupId>org.cassandraunit</groupId>
     <artifactId>cassandra-unit-spring</artifactId>
     <version>2.1.3.1</version>
     <scope>test</scope>
</dependency>

<!--Cassandra Unit Library-->
<dependency>
     <groupId>org.cassandraunit</groupId>
     <artifactId>cassandra-unit</artifactId>
     <version>2.0.2.1</version>
</dependency>

2. Annotate your Junit class with the following

@SpringApplicationConfiguration(classes = CassandraConfiguration.class)

@TestExecutionListeners({ CassandraUnitDependencyInjectionTestExecutionListener.class,
DependencyInjectionTestExecutionListener.class })

@CassandraDataSet(value = { "create-table.cql" }, keyspace = "ioe")

@EmbeddedCassandra

@Configuration

@RunWith(SpringJUnit4ClassRunner.class)

3. Place your DDL queries in a file named ‘create-table.cql’under /resource folder of your TEST

Leverage the Jmeter plugin for Cassandra developed by Netflix.

This third part will focus on the databack up stragey for Cassandra on AWS.

##Cassandra Data Backup Strategy

In case of a node failure in a cluster, Cassandra can automatically repair and get the node up to speed on the data using the replicated data that is present on the other nodes.

It is advised to enabled incremental backup and then collect snapshots at a regular intervals( say 24 hrs).

The snapshot backups and incremental backups can be collected from the nodes and then pushed into S3 for use during restore.

  • Snapshot backup should be taken on a daily basis at 12:00 A.M midnight.
  • Snapshots & incremental backup files older than 7 days can be deleted from S3.
  • S3 backup location should be named and organized based on Cluster and node names. In case of AWS these will be Region and AZs.

##Cassandra Node Failure Recovery Strategy

If a node in a cluster fails or if the node restarts and is out of the cluster for a certain time then it is mandatory to run the node repair tool on the node.

Execute the following command on the failed node soon after startup:

nodetool repair -dc <datacenter or AZ name> -h localhost

Example:
nodetool repair -dc us-west-2 -h localhost

Node repair makes sure that that old delete data(Tombstoned) does not resurrect as new data on this node.

##Reference

[Taking a Snapshot]

[Incremental Backup]

[Restoring from a snapshot]

This is the second part of the Cassandra series and I will try to talk about Scaling Strategy.

#Cassandra Scaling Strategy

Cassandra scaling will be based on two factors :

  • Latency of response for a request.
  • Amount of disk space left on the Cassandra node.

The cluster will always scale up and never down. Scaling up will improve the latency of a request and also provide new disk space to provide new incoming data.

Scaling will be done as at a cluster level as follows :

##Strategy 1

  • Select the cluster to scale.
  • Select AZ’s with low number of nodes.
  • Choose two AZ’s and add one node to each of the AZ’s.

##Strategy 2

  • A cluster will always have a minimum of 3 nodes. Hence scaling in a cluster will be achieve in increments of 3 nodes.
  • If a region has 3 AZ’s then add one node to each AZ.
  • If a region has less than 3 AZ’s then one of the AZ will end up having more nodes than the other AZ.

##Scaling Trigger Points or Threshold

  • Latency > 500ms for more than 1 minute.
  • Scale when disk space remaining is less than 30% of the total available diskspace on the node.

Caching Configuration

Cassandra Unit Testing

Cassandra Unit provides a library which sprins off an embedded Cassandra server for testing against.

This is very useful for performing Unit/Integration testing of code related to Cassandra.

Steps for Spring JUnit :

1
Include the following dependencies in POM

< dependency>

1
2
3
4
 < groupId>org.cassandraunit< /groupId>
 < artifactId>cassandra-unit-spring< /artifactId>
 < version>2.1.3.1</version>
 < scope>test< /scope>

< /dependency>

< dependency>

1
2
3
 < groupId>org.cassandraunit< /groupId>
 < artifactId>cassandra-unit< /artifactId>
 < version>2.0.2.1< /version>

< /dependency>

2 . Annotate your Junit class with the following

@SpringApplicationConfiguration(classes = CassandraConfiguration.class)

@TestExecutionListeners({ CassandraUnitDependencyInjectionTestExecutionListener.class, DependencyInjectionTestExecutionListener.class })

@CassandraDataSet(value = { “create-table.cql” }, keyspace = “ioe”)

@EmbeddedCassandra

@Configuration

@RunWith(SpringJUnit4ClassRunner.class)

3 . Place your table creating queries in a file named ‘create-table.cql’ under /resource folder of your TEST .

Cassandara Performance Testing[ Work in Progress]

Leverage the Jmeter plugin for Cassandra developed by Netflix.

[CassJMeter]